Tuesday, October 29, 2013

Warning Signs to Replace Your Windows

Ifyou’re trying to figure whether you should repair or replace your windows, here are a few clear signs that it's time toreplace them.

You Feel Drafts in Your Home


Even the best windows will allow a slight amount of air infiltration, but it should never be something you can feel or notice.

Your first instinct may be to apply weather stripping to the gaps however, noticeable drafts often indicate an air leak caused by more than missing or damaged weather stripping. In fact, sealing and weather stripping should not be considered as anything more than just a temporary fix.

So, what's the best solution to avoid these drafts? Replacing your windows entirely.

You Have Difficulty Shutting or Opening Your Windows


If you can't open or close your windows properly, it's time to get new ones.

This is especially true for older double hung and single hung windows, which have issues with balance.  The balance is the mechanism that keeps the window up when you open it. When the balance fails, the window will no longer remain up when opened and can slam shut, posing a danger.

You See Condensation Inside the Glass


If you have double-or triple-paned windows and notice condensation or fog inside the glass, you either need to replace the glass or the entire window - depending on the seriousness of the issue.

Condensation and fog between the glass panels can indicate seal failure. When the seal fails, moisture is able to enter the space between the panes of glass and as a result, air will condense on the glass. And when this happens, the insulated glass is no longer doing its job - which is to create a barrier to cold air.

Condensation in between the panes of glass will leave a white film which is caused by calcium deposited on the glass. If you see this white film, even if there is no visible condensation, it's a safe bet that the insulated glass unit has failed.

Your Energy Bill is Expensive

If your heating and cooling costs are high, it's likely that you have an inefficient furnace, or old windows that are simply not energy efficient.
So how do you know if you should replace your windows?
According to the Department of Energy's (DOE) website, "If your home has very old and/or inefficient windows, it might be more cost-effective to replace them than to try to improve their energy efficiency. New, energy-efficient windows eventually pay for themselves through lower heating and cooling costs, and sometimes even lighting costs."
What are your best bets for energy-efficient windows?
 
The DOE suggests looking for windows that have at least two panes of glass or ENERGY STAR® labeled windows. These are high-performance windows which meet efficiency guidelines set by the Department of Energy.
 
If your windows need replacement, call Kruse Home Improvement today at 860-877-0775  for an estimate.

Thursday, October 24, 2013

Getting Your Home Ready For Winter

Every October we slowly feel the temperatures dropping. The leaves start changing and winter coats are taken out of our closet. The changes in temperature bring changes to your lifestyle as well. Winterizing your home is one of these changes. Even though winter has yet to hit us, here are some great tips for winterizing your home.

Plumbing
Plumping can be a problem at any time of the year however, winter and the cold weather seem to put the most stress on your pipes. If you have an older home, your pipes are more susceptible to cracks and leaks. Inspect inside lines as best you can to ensure you don’t have a problem in the coming months. Even the slightest leak can freeze and create more damage in the long run. If your summer home will be vacant all winter be sure that all water lines are emptied and the water and gas are turned off.
Drafts

Window and door drafts cause up to 30% of all energy loss in your home. Cracked or old windows can be the worst culprit. If you can’t replace your windows or doors before winter, just simply roll up towels and place them on the bottom of outside doors. This will help seal out the cold air. You can also purchase plastic guards to go over windows. Keeping blinds and drapes shut will help prevent the cold draft as well.

Ceiling Fans

This is an old trick and we often forget about our fans in the colder months, but by reversing the direction of the blades it will force the warmer air back into the living space.

Thermostat

Setting the right temperature is very important when it comes to your heating costs. Just one-degree can make a difference and save you anywhere from 1-3% of your heating bill. Set your thermostat to 68-70 degrees during the day in the winter, and 65-68 degrees at night. Keep in mind that if you are out all day, lowering your thermostat can significantly lower your bills as well.

Furnace Filters

It’s very important to change your furnace filters regularly. Dust and dirt build up on filters and in turn prevent air flow from passing through.  As a result, the furnace has to work harder to create the same amount of heat. Change filters every month to ensure your furnace is working efficiently.

Water Heater

Many water heaters are set around 140 degrees at all times. Even though we all enjoy a steamy shower in the colder months, lowering your water heater to 120 degrees can save you a lot of money and you won’t even notice the next time you shower.

Winterizing your home can save you extraordinary amounts of money in the colder months. Little steps like these are worth receiving a lower energy bill.


source: http://restorationmasterfinder.com/restoration/winterizing-your-home-checklist-and-tips

photo organization: picture keeper + a giveaway!

If you have a digital camera, it's likely you've been uploading those precious photos to your computer. But maybe you don't have the time to print out those photos because life is busy. Reeeeeeallly busy??!! So the big question is...until you're ready to print out those photos, are you protecting them by backing up regularly?

We've all heard those horror stories from friends or family members that they suddenly had a hard drive crash...losing all of their photos in the process. Or maybe, God forbid, you yourself have even experienced a hard drive crash. Oh my, there is nothing more painful to think about - especially if you have hundreds (or thousands) of photos of your children stored away on the computer.

If you aren't already using a back-up drive, you should absolutely consider doing that. But if you are looking for a new, awesome alternative...I have just the product (and giveaway!) for you today!...


Have you heard of Picture Keeper? I had not heard of this product until I received an e-mail from my sweet friends at the company. The Picture Keeper is the simplest automatic picture backup device you can use to protect those precious photos. What's even better is that it's not a software program.

Nope, you heard me alright! No need to install something new on your computer. You simply plug the Picture Keeper device into your computer, it automatically locates all of your photos and saves them. That's it!

Yup, just plug it in, click start and the Picture Keeper does all the work for you! You can even use it in a digital photo frame, LCD TV, photo kiosk, or just store it away for safe keeping.

The Picture Keeper comes in four sizes to fit the needs of any digital photo collection. The first size is the Picture Keeper PK 4...

PK4 holds up to 4,000* photos and is $29.99. 
* estimate - based on an average size of 1MB per picture.

The second size is called the PK 8...

The PK8 holds up to 8,000* photos and is $59.99.
* estimate - based on an average size of 1MB per picture.

The third size is called the PK 16...
The PK16 holds up to 16,000* photos and costs $99.99.
* estimate - based on an average size of 1MB per picture.

And finally, for all those pros out there, the largest size is called the PK Pro...

The PK Pro holds up to 250,000* photos and is $189.99.
* estimate

How much is peace of mind worth to you? Not sure about you guys, but my digital photos mean everything to me and they are priceless. I have big plans to get them off my computer, printed, and into books very soon. You guys will soon hear all about my new system for organizing photos and creating simple scrapbooks. But until my home renovation projects slow down in a few months, those photos will be kept safe and secure on my Picture Keeper.

I couldn't wait to try it out. It was so easy! All I did was plug in the Picture Keeper device in the side of my laptop...

Then this window popped up on my desktop...

Once you start the backup process, you'll see the Picture Keeper working hard to locate all of your photos...

With the photos located, it's time to back them up...

As the Picture Keeper is backing up your photos, you'll also see how much time is remaining and how many duplicate photos were skipped. Once the backup is complete, the Picture Keeper details how much space is remaining and how many photos are on the device...

That was easy! When you're done, just eject the device and store away in a safe place until next time.

The Picture Keeper difference:

* Skips duplicate photos

* No software to install, wires to connect, passwords to remember, or monthly fees

* Use on multiple computers; PC and Mac compatible

* Once one Picture Keeper fills, just use another and the second will continue where the first left off. Amazing!!!

* Works well with all photo organizing softwares like Kodak Easy Share

* Easily use with your digital photo frame, favorite print kiosk or keep in a fireproof safe

I'm telling you guys, there was nothing easier to use than this genius product! I'm sold! And I hope I've been able to motivate you to get those precious photos stored safely on a Picture Keeper. If you're excited about the product and would like to buy one now, you can find the Picture Keeper here on their site.

Or you can go ahead and enter the giveaway for a chance to win the Picture Keeper PK 4....courtesy of your (and my) new friends over at Picture Keeper - thankyouverymuch! As always, entry into the giveaway is made simple. I don't make you jump through hoops for a chance to win. Just follow the easy entry guidelines and the winner will be contacted by e-mail.

When you're done entering the giveaway, consider signing up for Picture Keeper's free monthly backup reminder. There is no purchase necessary to join this reminder list! This way you will never forget to backup those precious photos, no matter how you're doing it.

Good luck!

a Rafflecopter giveaway

* Picture Keeper has agreed to giveaway the PK4 device. I was not paid in cash for this posting. I was sent a product for review and all opinions are my own. 

Wednesday, October 23, 2013

DIY: wooden chalkboard labels


yes, i'm at it again in the toy organization department. you see, what worked for me in the old house isn't working as well here in the new house. that's bound to happen in a new space/home. sure, my little mesh square bins with cute labels are awesome at containing the toys and keeping them organized in their various categories. and they fit perfectly into the 2 built-in shelving units in the playroom. but the issues with that system in this house?...

1.  the bins are see-through which means the kids can see everything all the time and that means...

2. they have complete access to all of the toys all the time which means...

3. the messes in the playroom have been epic which means....

4. *i* am dealing with those epic messes and...

5. the see-through bins were creating a lot of eye-clutter (in the old house they were in the playroom closet) and finally....

6. this may sound crazy, but i don't want the playroom to SCREAM "playroom!!!!".

let me explain number 6.

in the old house the playroom was its own contained room on its own floor. oh how i miss those days and our old playroom...

in this house, the playroom is in the heart of our living space. the room is in between the garage entry and kitchen. every time i walk through the space (countless times each day) and see the mess, i'm compelled to stop and tidy up. it's me. i can't help it because i enjoy living in a clean, organized home. but i'm also careful not to push my OCD issues onto the kids. yes, i want to help them create good habits and get into a routine of picking up after themselves. there's a way to do that and it takes time.

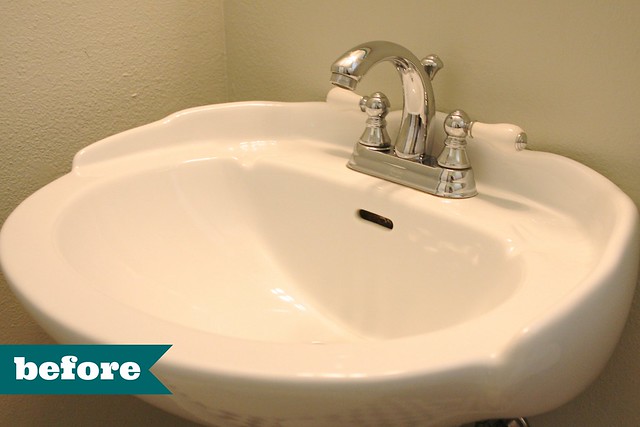
in order to create a happy medium here, i decided the playroom needed a bit of an overhaul. that's an understatement, but let's go with that. we've lived here for 2 months now and in that amount of time i let the room speak to me. i'll be sharing a full playroom reveal in the coming days, but here is a sneak peak of one wall before and after...


heaven!!!

we'll be talking more about this new wall unit soon and i'll share lots of pictures in the coming days. but  this wall unit has literally changed the life of this space, makes the room feel cozier, and i can't *see* a lot of toy clutter. it makes my eyes happy, what can i say?

today let's talk about a small DIY project i completed in the playroom during the makeover - adorable chalkboard labels...on the cheap! as you've probably seen around blog-land and other places, chalkboard labels are a big rage in kid's spaces. they can cost you a fortune too if you buy them off the rack. for example, i love these labels from pottery barn kids.....

but for $10 you receive a whopping TWO labels. if i purchased the 10 i needed from PBK, i would be out $50 plus tax and shipping. i knew i could cut the cost significantly and create some myself.

last week i shared a photo on instagram while at one of my happy places getting my DIY on...


that's exactly what i was doing there - re-creating chalkboard labels that were just as cute but much less money. here's what i did to easily to create adorable chalkboard labels.

in the lumber department, i located long strips of hobby board. the size is on the label shown here below. to create 10 labels i needed 1 1/2 strips of hobby board. but depending on the size label you choose to create, your amount will vary...

the home depot lumber dept employee happily cut the long strips down into 5" pieces for me. i don't own a table saw (yet!) so when i'm ever in need of cuts, the home depot is a great place to buy wood and have them cut it for you on the spot...

with my wood pieces cut to 5", i sanded down all sides using this great hand sander...

i found this sander with replaceable sanding sponges at the home depot a long time ago. i love it! it works really well when you need to do something by hand. here you can see the splintered edges...

after sanding, it's nice and smooth...

 next, i marked the holes for drilling. i decided it would be easier to drill the holes before painting.


if you've never used a drill before, they are super easy to handle after a little lesson from a handyman or home improvement store employee. this is a great project for getting your feet wet in the drill world.

photos courtesy of a precious 9 year old...my look courtesy of stress, lack of sleep, and not enough coffee (or wine). oh, and pay no mind to the conditions of my garage in the background. that's on my hit list....


since i was using twine to hang my labels, i made sure to cut a hole in the boards that would fit the twine thickness. just make sure the drill bit will accommodate whatever you're using to hang the label...


with the boards sanded and drilled, it was time to paint!...

this can of chalkboard spray paint was $6.99 from my local craft store. it more than covered the labels and still have a ton remaining for future projects.

i sprayed a good coat on the labels. keep in mind, this is a job for outdoors because of the strong fumes....

i just spread them out on my drop cloth in the driveway and went to town...

these labels are in the playroom and will be handled by the kids, so i sprayed 3 coats for added durability...

after an hour of spraying and drying in between coats, they're done!...


i love how rustic they appear. you can still tell the labels are wood and i like that warm feeling in a playroom. with the paint completely dry and twine at the ready, i used a chalk marker to write the toy categories...


the chalk marker was found at my local craft store for $2. i wrote the toy category name on the label, then added the twine to one of the pre-drilled holes...

once the chalk was dry (a minute or so), i hung the label on the basket and finished adding the twine through the second hole...

then snipped off the end when i was done...

adorable, personalized to your liking/size and inexpensive chalkboard labels!...


eat your heart out pottery barn kids!...


we'll talk baskets soon too!...


if you've been eyeing chalkboard labels but don't have the wallet to support your dreams, these are a great alternative. here's my cost breakdown:

wood = $4.50 (for 15 5" pieces!)
chalk marker = $2.00
chalkboard paint = $6.99 (will plenty leftover!)
twine = had already 
sander = had already

grand total for my DIY chalkboard labels = $13.49

go make something today and save yourself (a lot of) money! have a great day!

(i linked up with i heart organizing)

Monday, October 21, 2013

Easy DIY: How-To Replace a Bathroom Faucet


You guys have followed along over the last several months as I've managed and overseen home improvement projects. Most of those having been completed by an outside company simply because I can't do them myself (new roof, pool renovations, install of french drains). No surprise, I've also spent quite a bit of money outsourcing those various jobs. So whenever I can complete an improvement project myself, I'm all over it.

Moen recently sent me a beautiful new bathroom faucet and I couldn't wait to get outside my comfort zone to install it myself.

Yes! I said "myself".
 photo 7112ee78-e252-4a9c-b1de-847e6ba5c04c_zpsff9c2133.jpg

Isn't it beautiful?! Since this faucet has a spot and fingerprint resistent finish, I knew exactly which bathroom would benefit from it. The bathroom in the room of my 9 year old...


No, the old faucet wasn't *that* bad. But it felt outdated and my 9 year old was putting it to the test for sure. After spending a little time doing some research into how exactly I would replace the faucet, I realized how simple the job was. I couldn't believe it and was downright excited to do the job myself. Also, if I ran into any install issues Moen has a customer care line to walk you through the job. Nice to know they were there for me, but I can proudly report I didn't end up calling - woot! Didn't even call my dad!

Let's get started!

Here are the tools needed for the job: pliers, wrench or basin wrench, gloves to protect your hands, and a bucket to catch water. You'll also need some cleaning supplies for cleaning under the old fixture before adding the new one.

First step is turning off the water source. Behind my sink I was able to turn off the water easily, but if necessary you may need to shut off the main water source. All I did was turn off both supply lines behind my sink. Then I turned on both the hot and cold water on the old faucet to make sure the water was off and anything that needed to drain came out into the sink...

Next, time to disconnect the old water lines. This will require your wrench because they are on nice and tight. If they've been in place for a long time, it's going to take some elbow grease. Let's just say I have plenty of pent up frustration and took it all out on the demo part of this job - haha! After working at it for a few minutes, they're off!...


With the water hoses detatched from one end, you'll now remove them from bottom of the old faucet. This tends to be a tight space so try to have some patience...

Now that the water hoses have been removed, using your wrench again you'll unscrew the old faucet from the sink itself. Since my old faucet was using all 3 openings in the sink, I had to unscrew both the cold and hot water sides as well as the pieces for the pull up drain in the middle...


Removing the middle plastic pipe that connects the sink to the main drain pipe...and that houses the pull up portion of the drain...that's going to take some muscle to disconnect. Especially if, like in my case, the old faucet has been there a while...

With everything removed, your old faucet will easily come off. Be prepared to see what has been living underneath - yuck!...


You'll also remove the main drain pieces from the bottom of the sink. As you can see in the photo below, the drain piece is simply twisted into the pipe under the sink. Once you've untwisted the drain from the pipe below the sink. everything comes apart to reveal this...


Gross!

After a good clean-up, and the old faucet completely removed, it's time to install a new, clean, beautiful faucet!

And don't be scared - it's just as easy as removing the old one!

With this Moen Boardwalk 1-Handle faucet, you can choose to have the plate beneath it or not. It's a personal preference and the included instructions show you how to do both. I chose to use the plate so I put them in place by placing the plate on the sink and then feeding the faucet piping through the middle sink hole...


Moen has all of the pieces needed for a complete, easy install. Including a great little wrench that's small enough to fit under the sink and tighten the faucet into place. I added the attachment fitting, bolt and tightened the new faucet in place...


With the main faucet tightly secured, I next installed the drain. Again, everything just screws together...


With the new drain and pipe under the drain / sink screwed together tightly, time to add the stopper feature of the drain and the connectors for it under the sink. This is the function that allows the sink to close to fill with water, and then drain when you push down on the little plunger behind or on top of your faucet. There are 2 pieces to create this feature and all you need to do is connect them according to your faucet's directions. It's simple...

With the faucet completely installed, it's time to add the water lines back into the supply source...

Make sure they are tight.

Now comes the moment of truth -  turning on the faucet...

It works!

And the stopper function both keeps water in and drains it...


With the water on and running I double checked all of the connections to make sure everything was secure and to verify no leaks. All good!

And now there is a beautiful new faucet in my son's bathroom!...


So happy with the results! And completing this easy home improvement project took only 45 minutes to an hour. I didn't have to call out a handyman or a plumber - I didn't this job 100% on my own.

I love this Moen faucet and think you would love one in your home too. The faucet isn't just easy to install with the included instructions, it has many great features and it's beautiful!

This particular faucet, the Boardwalk 1-Handle Spot-Resistent faucet, makes keeping a cleaner bathroom easier. With 3 kids in the house, I could definitely use more of that in my life! :-) I'm sure you can too! It's brushed nickel with Spot Resist finish fends off fingerprints and everyday water spots so you can go on with your day. The Moen Boardwalk meets WaterSense criteria, using up to 32% less water without sacrificing performance.

And it's pretty!...
 photo 571adbf3-bd56-4be6-8330-4c506cee6b63_zps177c4e06.jpg

If you like this model, the Moen Boardwalk can be found at your local Lowe's...

Moen Boardwalk 1-Handle bathroom faucet in Spot Resist

If you enjoy following your favorite companies via social media, you can find Moen right here on Facebook...

Like Moen on Facebook

I hope I've inspired you to complete this easy DIY project in your own home. I'm patting myself on the back today for having installed this baby all by myself! :-)

Have a great day!


This is a Sponsored post written by me on behalf of Moen, Incorporated. All opinions are 100% mine.


Visit Sponsor's Site