Wednesday, July 24, 2013

KHI Quarterly V4 Q3 - Summer 2013

Top Summer Remodeling Projects that Increase Your Home’s Value

There are many remodeling project options that can increase a home’s resale value and add plenty of enjoyment as well.  Budget-minded buyers want a home that is sustainable, energy efficient, and will last a lifetime. It is important to know what improvements will best increase home value without breaking your budget. If you’re planning to remodel, you should concentrate on projects that are energy efficient and add character and comfort to your home.

1.  Kitchen Remodeling
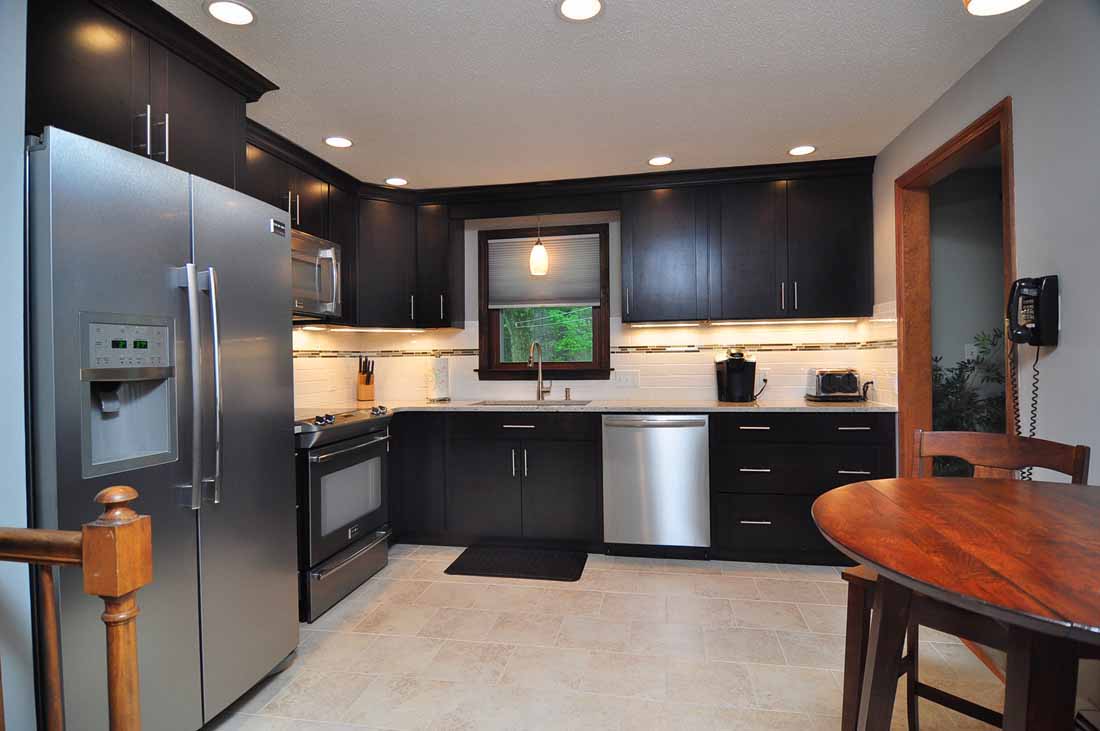
There is no doubt that the kitchen is often viewed as the most important room in the house. It is where many families spend the majority of their time which makes it one of the most essential selling points for prospective buyers. According to HGTV, homeowners can expect up to 120% return on investment on a kitchen remodel. Gourmet kitchens updated with chef quality appliances will increase your value even more.  You may not need a complete kitchen overhaul, but it is important to consider energy efficient appliances that use 10-50% less energy and water than ordinary appliances. New appliances can add appeal and functionality to even the smallest of kitchens and are a great investment if  you are looking to increase the value of your home.

KHI specializes in kitchen remodels
 2.   Adding Siding
Curb appeal is the first thing people notice about a house. Upgrading a home’s siding can result in a significant increase in curb appeal and overall home value. Replacing siding makes financial sense as Remodeling magazine's annual Cost vs. Value report ranked adding fiber-cement board siding to your home as the best home improvement investment. It offers a return at resale net of up to 86.7%.   Fiber-cement products are a durable, low-maintenance alternative to wood and vinyl. They are very strong and are highly resistant to fire, wind, insects, impact, and moisture.

3.    Adding a Deck
A new deck will increase the value of any home. While there are several ways to add living space to your home, few are as cost effective as building a deck.  According to HGTV, you can expect up to a 90% return of your investment just by adding a deck. Many people are choosing to stay home for vacations, which makes outdoor living spaces more desirable. A new deck is a great option whether the owner is looking to sell, or just add a new space for their family to relax. You can add an outdoor kitchen with a built-in grill, refrigerator and working sink, or simply include  built-in furniture such as benches.  Deck additions and remodels also make the house more appealing to prospective buyers when the homeowner decides to sell.

Deck built by KHI
 4.    Fresh Paint
A new paint job is one of the most inexpensive and time-effective ways to give any home a more crisp and newer look. When selling a house, one of the first things a Realtor will suggest is a fresh coat of paint. The return on investment of a quality paint job is among the best investments a homeowner can make, bringing up to 112% of the cost that you paid.  Fresh paint, in modern colors, will update the look and feel of any room. When choosing the perfect paint, color isn’t always the only factor to look at. Homeowners might want to consider using low-VOC paint, which makes your home more eco-friendly. Low-VOC paint also lets you avoid breathing in dangerous chemicals like benzene, an off-gas found in regular fresh paint.
 
Fresh paint brightens this room renovated by KHI
5.    Adding Energy Efficient Windows and Doors
For many homeowners and buyers, energy efficiency is a priority. To prospective buyers, outdated, drafty, single-pane windows are a  major turn off. Adding a new set of windows to a home can give it a bright and updated look. In addition, Energy Star states that adding Energy Star-rated windows can save homeowners up to $500 a year in heating and cooling costs. HGTV states that homeowners who install Energy Star-rated windows can also expect up to 90% return on their investment. The efficiency and return on the investment are great reasons to upgrade your windows now. In addition, new advanced energy efficient exterior doors not only increase curb appeal but can stop drafts and save you money.


Tuesday, July 9, 2013

Choosing Tiles for the Shower

There are many different types of tile for a shower. It is important to consider the benefits and drawbacks of each specific type of shower tile especially if the tile will be used on the shower floor. Aesthetics, safety and durability are all considerations and choosing the proper tile is largely a matter of personal preference.
 
 
When choosing bathroom tile for a shower you need to consider materials and colors. A bold colorful bathroom may be appropriate for a child’s bathroom but sophisticated colors may be best for an adult or guest bathroom. Patterning the shower tile to fit the mood of the room is important to create the right atmosphere.
 
Ceramic and glass tiles are very popular materials for use in showers. Tiles made of linoleum, concrete, or stone can also be used. Specialty tiles might be made of resin or metal. Whichever you choose, it is important that the tiles will stand up to frequent wetness and cleaning. Harsh washing and certain chemicals can degrade some specialty tiles quickly. Be sure to use proper cleaning materials.
 
 
In terms of design, there are many different types of bathroom tile for a shower. Many people choose large tiles because they are easier to install than smaller tiles. Often, people find that natural variegated colors look good in a shower, or the simplicity of plain white may be desired.
 

Beyond color and material, there are also very unique tiles made specifically for showers. Some tiles even change color in hot or cold water. It is also common to see tiles that are decorated with bath-themed images designed specifically for bathrooms and showers.


Using regular shapes like squares is most common for shower tile however some people choose more complex designs. Piecing together tile by hand can be extremely difficult, and it can be even more difficult if the shape is on multiple planes.
 
We would be happy to discuss the options you have when choosing the best type of tile for your shower within your budget. Call Kruse Home Improvement today at 860-877-0775.


Wednesday, June 26, 2013

Adding a Shower Stall

Photo taken from KHI gallery
Most people prefer stand up showers over bath tubs for a number of reasons. Taking a shower is so much quicker than spending time soaking in a tub; on average showers use less water than baths; shower stalls take up less space and in turn make your bathroom look bigger; and showers actually


make you cleaner than baths because the water and dirt is running past you and down the drain.
 
Bathroom remodeling projects tend to have a high return on their value. Homeowners who plan carefully and choose the right shower stall for the bathroom can feel confident that they have made a good investment for the home. In addition to a great return on the initial investment, shower stalls offer convenience for homeowners and their guests, and safety for the elderly.  A master bath can become a luxurious suite with the addition of a separate shower stall.
 
When cleaning your shower stall, try this homemade solution courtesy of TLC:
  1.  Mix 1/2 cup vinegar, 1 cup ammonia, 1/4 cup baking soda and 1 gallon of hot water. Be sure to wear rubber gloves and work in a well-ventilated area when using this powerful solution.
  2. Apply it to the walls of the shower with a sponge, scrubbing with a brush if necessary, to remove all the scum.
  3. Rinse well with clear water and wipe dry.

To keep your shower stall clean, follow these guidelines:
Photo taken from KHI gallery
  • Keep mildew from taking hold by wiping shower walls with a towel after each shower.
  • If the shower area is subject to mildew, periodically spray it with a mildew inhibitor and disinfectant.
  • Leave the shower door slightly open to allow air to circulate; this will discourage the growth of mildew.
  • Remove hard-water deposits on shower enclosures with a solution of white vinegar and water.
  • Glass shower doors will sparkle when you clean them with a sponge dipped in white vinegar.
  • Add 1 cup liquid fabric softener to 1 quart warm water, and use to loosen and clean soap scum from shower doors.
  • Mix 1 part mineral oil with 4 parts water in a clean, empty spray bottle. Spray on soap scum and dirt in your shower or tub. Wipe off with a sponge.
  • Remove water spots on the metal frames around shower doors and enclosures with lemon oil.
  • If the grout or caulking in your shower breaks away where the walls join the tub or shower floor, recaulk immediately to prevent water damage.
  • Never use harsh abrasive powders or steel-wool pads.
  • Coat the tile walls of your shower with furniture polish to prevent soap scum buildup and water spots.
  • Clean mineral deposits from a shower head by removing the head, taking it apart, and soaking it in vinegar. Then brush deposits loose with an old toothbrush. Clean the holes by poking them with a wire, pin, toothpick, or ice pick.


Thursday, June 20, 2013

Simple Tips to Unclog a Kitchen Sink

If your kitchen sink ever got clogged, you know what a nightmare it can be. You don't necessarily have to use concentrated chemical cleaners to unclog your sink; it can be done inexpensively with items found right in your home. Before running to the store to get those harsh cleaners, try some of the tips below to unclog your kitchen sink.
 
Hot water
 
If it’s grease that’s clogged your sink, try pouring extremely hot water down the drain. The hot water will break up the clogs in its way, as it travels through your pipe. You can also try a mixture of 1/3 cup of vinegar and 1/3 cup of baking soda. First, pour the baking soda down the drain followed by the vinegar. As the two components starts mixing, it will fizz out, breaking most of the stubborn clogs in its way.
 
Once you have poured down the ingredients, immediately plug the drain with a cloth or a drain plug. This will prevent the foams from escaping too soon. Allow the solution to fizz thoroughly for at least 30 minutes before pouring hot water on it. This will clear the drain from retaining any residue foam or clogs.

Plunger

If your sink is still clogged after using the baking soda and vinegar solution, try using a plunger to remove the remaining clogged up material. The vinegar solution will loosen up any particles stuck in the drain and by using a small plunger you can further clear the clog. Be sure to use plunger wide enough to cover the sinkhole.
Try applying petroleum jelly on the rim of the plunger and fill the sink with enough water to cover the plunger cup. Cover the top end of the plunger with a towel for better grip. Press the pump directly on the sinkhole and pump repeatedly until the clog clears. This will mostly clear the particles clogging your sink. If you still find your sink clogged, it is time to call in a professional.
 
Chemical drain cleaner

A quick and efficient way to unclog a drain is through chemical cleaners. Buy a bottle of chemical drain cleaner from the local grocery shop; follow the instructions given on the bottle precisely. Make sure to put on your safety gloves and to keep the room well ventilated before using any chemicals around home. Refrain from using plungers while using chemical cleaners, as the sprinkle of caustic chemicals can splash back on your hands.

Plumber's snake
One of the tried and tested ways to clear clogged drains is using a plumber's snake. A plumber's snake is nothing but a coiled wire that is attached to a crank. With the help of the crank, the coiled wired is inserted into the pipeline and pulled out quickly; the process is repeated continuously until the wire breaks up the clog as it moves. 
To avoid any future clogs, try cleaning your sink regularly and avoid dumping any fibrous materials or remaining food items down the sink.


Tuesday, June 11, 2013

Kitchen Flooring

Homeowners must be careful when selecting a type of flooring material for the kitchen as they typically host a great deal of traffic, and moisture is also frequently present. When you’re ready to shop for a kitchen floor, you’ll find that there are several choices. Here are some great choices to consider, along with some of the pros and cons of each.

Sheet vinyl flooring is one of the most common choices for a kitchen floor because it is very resistant to spills, grease and dirt as well as water. This type of flooring is easy to clean and comes in a huge variety of patterns, styles and colors to choose from. It’s also one of the less expensive flooring options. The sheets are available in 6-foot or 12-foot rolls and therefore show very few or no seams after installation. This also makes it very easy to change floors if you renovate your kitchen.

Some disadvantages to vinyl sheets are the wear and tear that it is prone to over time and from a resale value, it may lack the appeal of some of the more expensive floor options.
 
Kitchen renovation done by KHI
Vinyl tiles have similar qualities to sheet vinyl but are individual tiles. They are water resistant, easy to clean and inexpensive. A great advantage to having vinyl tiles is that if damage occurs you can easily change the tile without replacing the entire floor.
 
One thing to keep in mind with vinyl tiles is the dirt-catching seams you end up with. Also, from a resale standpoint vinyl tiles have one of the lowest overall appeals.

Ceramic tiles are one of the best choices for a kitchen floor. In addition to being completely waterproof, they are very durable and will stand up to all sorts of abuse. Ceramic tile comes in a wide variety of sizes, colors and pattern choices. You can also mix different types or colors of tile to form patterns, borders or even pictures. Quality ceramic tile floors are very popular and will add to a home’s resale value.
 
Mixing different types and/or colors of tile
to form patterns adds style your kitchen.
Though ceramic tiles do have some downsides, the downsides seem to be a matter of personal preference. For example, tile is the hardest and coldest of the floors to walk on. This can be offset to some degree by adding an area rug and if you want to really warm up the floor, you can have radiant heating installed underneath
the tiles (for more informa-tion on electric radiant heating contact Kruse Home Improvement). The other issue that some people may have with ceramic tiles is the grout lines, which are a little harder to clean than the tiles themselves. This can be minimized by using larger tiles with small grout spaces between them, and by making sure that the grout is sealed after installation.

Laminatefloors have become more popular in the kitchen. There are dozens of patterns and colors and they are usually designed to closely resemble other popular flooring materials such as wood, tile or stone. The floor has a “spring” to it which makes it one of the softer and more comfortable floors to stand on. A well-selected and well-installed laminate floor can add to resale value.
 
One thing to keep in mind if choosing laminate is that if there is a lot of traffic in your kitchen and chairs or bar stools are present, the laminate can be prone to scratching. Laminate also requires specific cleaning products for best results and longest life, and may not stand up to a lot of water over time.

Hardwood floors have become a popular
choice for kitchens.
Hardwood floors have found their way into the kitchen due to the recent advances in the quality of polyurethane finishes that wood has. Although some people are still a little leery of hardwood floors in the kitchen, the floor is beautiful, durable and compliments pretty much any style of kitchen. Hardwood floors can also add to the resale value of your home.

Hardwood flooring requires proper sanding and finishing to look good and to hold up in the kitchen and therefore is typically not a do-it-yourself project. It also has some of the same drawbacks as laminate, requiring special cleaners as opposed to simple damp mopping, and is prone to scratching and damage from excessive water.

For questions on kitchen flooring call Kruse Home Improvement
at 860-877-0775.


Wednesday, May 29, 2013

Under Cabinet Lighting for Kitchens

Under cabinet lighting has been growing more and more popular over the years. You will find there are major benefits to placing lights under your cabinets. Kruse Home Improvement has installed under cabinet lighting for many of our customers. Under cabinet lighting can provide two functions in your kitchen. It can provide task lighting for countertop food preparation and accent lighting to highlight your countertop and backsplash. If you are planning to remodel your kitchen, below are more reasons why you may want to consider adding these to your kitchen.
 
Lights under your cabinets give direct light to an object eliminating or lessening shadows. This makes your room appear bright and clear which is perfect for a kitchen. In addition, under cabinet lights generally use less power which allows you sufficient light at a minimal cost.
 
Under cabinet lighting installed by KHI
brighten up this kitchen.
In the past, most people considered using lights only on the ceiling. Under cabinet lighting gives additional distinction and unique style to your room. Many kitchen countertops are made from granite or marble. These lights can make your stone countertops shine.
 
These under cabinet lights installed by KHI really
illuminate the countertop and backsplash in this kitchen.
Types of under cabinet lighting include the following:
Strip Lights: These are rectangular shaped fixtures and they work well with fluorescent bulbs. They are great for providing diffused light to the kitchen.
Puck Lights: These are round fixtures that got their name from their round, hockey puck-like size and appearance. These lights are best for highlighting countertops and backsplashes. Puck lights work with LED, halogen and xenon bulbs and can be mounted in different positions to either aim downward or at the backsplash. As an alternative, puck lights can usually be recessed into cabinets.
Linear lights: Linear lights are often used with fluorescent bulbs. They are the most popular types of fluorescent under cabinet kitchen lighting because they are thin, which allow them to be hidden behind the cabinet trim.
 
Under cabinet lighting installed by KHI.
You will find there are a wide variety of bulb options for under cabinet lighting. Choose a soft, dim light or a bold and bright light. The choice is yours. It is not hard to find the bulbs you like best. Types of bulbs include the following:
Fluorescent bulbs: These are commonly used for under cabinet lighting fixtures. They create a bright work area by providing clear light. The disadvantage of fluorescent lights is that they cannot be dimmed and they sometimes flicker.
Halogen bulbs: Homeowners seeking a bright, white light choose halogen bulbs. These bulbs have an extremely long life and can last up to 2,000 hours.
Incandescent bulbs: These bulbs are the least popular choice for under cabinet lighting as they are not very bright. Incandescent bulbs are not energy efficient and they emit heat. They last half as long as halogen bulbs.

LED bulbs: These bulbs are becoming a more popular choice among homeowners as they become more commonly available at lighting and home improvement stores. LED bulbs come in a variety of colors and provide homeowners with the ability to create unique decorative features. LED bulbs are best for puck lighting.
Xenon bulbs: These bulbs have the longest lifespan of all under cabinet light bulb options. They can last up to 10,000 hours and are energy efficient as they do not create heat.
You do not need to spend a lot of money to install under cabinet lighting. The bulbs and cables are not expensive but will add to the look and value of your home. In addition to a kitchen, under cabinet lights are popular in a study room, basement or garage.
For more information, call Kruse Home Improvement at 860-877-0775.


Article Sources: http://EzineArticles.com/3523488
http://ezinearticles.com/?The-Benefits-of-Under-Cabinet-Lighting-in-Your-Kitchen&id=3523488

Wednesday, May 8, 2013

Replacing Kitchen Cabinets

Thinking about replacing your kitchen cabinets? If so, below are some exciting things to consider as you plan your new look.

When planning your new cabinets, consider changing the layout of your kitchen. Moving appliances to new locations can improve the look and flow of your kitchen. If your kitchen is more than 20 years old, most likely relocating the appliances would make your kitchen more functional. If you’ve been lacking storage space, changing the layout is an opportunity to add more cabinets and have the storage you need.  In addition, new cabinets will allow you to add features such as pull out shelves to help reach the back of the cabinet and lessen unused space.

Mechanical system updates such as additional lighting and plugs or a range hood that exhausts outside may require a full scale renovation. It is always a good idea to ask about these options as mechanical items are easier to add when cabinets are removed and may save the need for a full scale kitchen renovation down the road.

When your old cabinets are removed, it is also the perfect time to change your flooring. Keep in mind that if you’re adding ceramic tile on a vinyl floor, the additional height may create an issue when installing new appliances so the time to add tile is when the cabinets and appliances are out.

If you plan on living in your home for many more years and you dislike the appearance of your kitchen, changing the cabinets will allow you to make upgrades at a very reasonable price. Kruse Home Improvement specializes in kitchen renovations and cabinet installations. Call us today to discuss your options.
 
Cabinets installed by Kruse Home Improvement